Last
month we talked about “Science Based Team Roping Basics” and as a
short review I will remind you that “Gravity”
moves your loop down and the “Momentum” of your swing moves
your loop to the left. Both
are a given in the basics of team roping and effect every other element
of practice and competition.
Another
basic element of team roping is the grip of the rope and the resulting
swing. How you grip the
rope determines the action of the swing and loop.
The
Mexican Vaquero grip and swing are generally used in team roping.
After WWII, Plymouth and New England nylon coil ropes became
popular. They adapted
easily to the Vaquero swing because the ropes hung straight or with
“back-swing” and were difficult to manage with any other grip and
swing. Most team ropers
continue to use that outdated swing even though we now have highly
superior, individually twisted, machine made team roping ropes.
The contemporary roper has the option to learn and develop new
and more efficient techniques now that the technology is available.
 The
Vaquero grip and swing are the basics that require a heeler to learn
timing. The “wobble” of
the loop, created by the Vaquero grip and swing, does not allow the loop
to be “set up” in a position for the rope tip to enter the “catch
area” from a direction that gravity and momentum can be used to the
ropers advantage. As a
result timing becomes necessary. Most
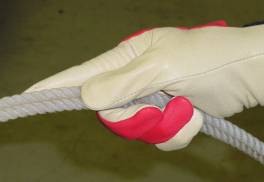
of today’s ropers grip the rope with the back three fingers and extend
the first or pointer finger on the loop (see photo 1) in the old Mexican
Vaquero style. The rope is
turned over by swinging the back of the loop and then pushing and
twisting the front of the loop to the left with the pointer finger along
with a twist of the wrist. The
Vaquero swing turns over at least 180º
every revolution and
moves generally right to left as it opens up in front of the roper over
the steer. The loop is
revolving or turning over when it should be gliding left with momentum
and down with gravity for the catch.
 There
is an option. We have developed a natural, science based grip and swing
that we use in our training program.
Many ropers refer to our grip and swing as the
“Michael Jones Swing”. The
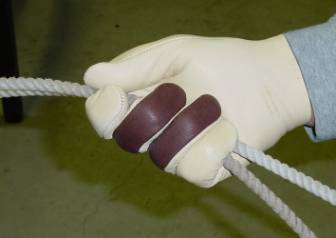
grip of the natural swing is similar to the right hand grip on a
right-handed golf club. (see
photo 2) Beginner ropers
and ropers trying to improve find the swing less complicated to conquer.
The swing can be learned when practicing from any actual roping
position. (you will waste
your time trying to learn it on a dummy from the ground).
- Grip
the rope with the forefinger (ex-pointer-finger) wrapped around the
coils and place the thumb on the coils to create a grip against the
forefinger. The most
amount of pressure from the grip is on the thumb, forefinger and
next two fingers. There
should be very little contact with the rope and the little finger.
-
Grip
and swing the front side of the loop, hondo down, without turning
the loop over. (Revisiting
last months article could be helpful.)
The elbow must remain elevated and behind your hand.
Allow the rope to “dip” down to the left as it crosses
the steer while the thumb and hondo remain down.
The back of the loop is kept vertical above the hondo.
-
The
only motion of the wrist is a slight wrist roll as the loop is
powered to the top of the swing.
Make the circle of the swing with the forearm.
-
The
elbow must be in a stable (elevated) position behind the swing and
not “pumped to swing the loop.
The
bio-mechanics of the natural, science based swing (the Michael Jones
Swing) allow a heeler to set up the rhythm of the catch before and
during the heeling corner. This
allows the heeler to “act” on the rhythm of the run rather than
“react” to the timing of the position of the legs and body of the
steer. When the rhythm of
the run is set up properly the steer will automatically be roped in time
and practicing the difficult task of timing becomes unnecessary.
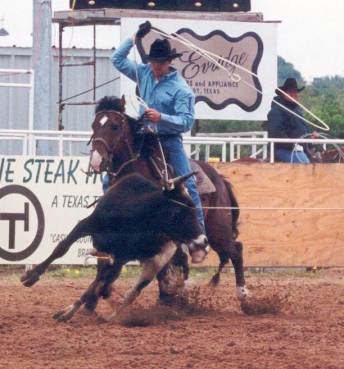
Here
is a step-by-step description of the bio-mechanics of the science based
heeling corner using the Michael Jones swing and setting up the rhythm
of the catch. (see photo 3)
-
Before the corner, swing the loop over the steer using the method
above. Notice (see photo 3) the thumb down, hondo down position of the
rope over the steer. Imagine
the entire path of the orbit of the swing and note how the orbit of the
loop swing covers the body of the steer.)
-
Swing aggressively at your best swing speed.
Use the same, aggressive swing speed for all steers, slow or
fast.
-
 When
the steer’s head starts to turn, power the rope up into the top of the
swing, keeping your loop over the steer, before you or your horse make
any motion to enter the corner. This
is the motion that sets up the rhythm and prevents dragging the loop
through the corner.
-
As the steer’s head is pulled down and left, his hips and feet
elevate. As the rope passes
over the steer, the heel horse will automatically be “cued” into the
corner. The front end of the horse will be moving down as the
steer’s hips and legs are moving up.
The horse, loop and steer will all be in the same rhythm.
Notice (see photo 3) how Michael is watching the steer from the
left side of his horse while keeping his loop over the steer.
If you maintain rope speed and don’t get caught timing the
steer, the speed of the horse and steer will maintain the rhythm for
several hops.
-
It is the header’s responsibility to turn the steer’s head to
notify the heeler when to set up the rhythm of the catch before leaving
the corner with the steer. The
header must maintain an aggressive steady pull on the steer at or
slightly faster than the speed the steer leaves the corner.
-
Maintain the loop over the steer through the corner while
maintaining the “dip” of the swing.
-
Maintain an upright body position and ride deep or close enough
for the hondo to point at, and the tip of the loop to swing above, the
shoulders of the steer before you separate and deliver.
(see photo 4)
-
Deliver the loop by swinging (not throwing or pushing) the tip of
the loop into the opening in front of the legs of the steer.
Lower the hand flat, from the top of the swing, without lowering
the elbow. Hang on to the
loop and guide the back of the loop to the ground.
Guide, don’t push the hand-hold !!!
-
Slack ! Dally ! and GO TO THE PAY WINDOW !

What
time is it? Maybe it’s
time to develop new and more efficient roping techniques.
The technology is available and timing is one of the techniques
that can be improved – by abandoning it.
Does
your swing effect your horsemanship?
Maybe we’ll talk about that next time.
Until
then - enjoy the process,
David